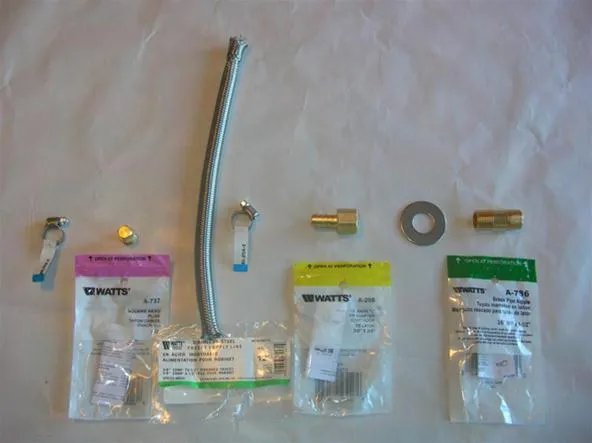
You can buy Kewler Kit conversions that supply you with a pre-build bulkhead and faucet for converting a 10 gallon Rubbermaid beverage cooler into a mash & lauter tun. But off-the-shelf components from your local hardware store work just as well, and cost far less. I got all my parts at my local Home Depot for a fraction of the cost of a Kewler conversion kit, or other commercial products.

Parts List:
Here are the parts you will need for the conversion (see picture, left to right):
- all stainless steel ¼” hose clamps x 2
- ½” x 12” (or larger) braided stainless steel supply hose
- 5/8” stainless steel fender washer (sometimes hard to find, but tryFastenal
- seal from plastic spigot of cooler (shown below)
- 5/8” O-ring (preferably heat resistant, if you can find one)
- 3/8” threaded ball valve
Assembly:
- using a wrench to firmly hold the nut inside the cooler, remove the plastic spigot from the Rubbermaid cooler

Stainless steel braid- cut the ends off the stainless steel braided supply hose using a hacksaw or rotary tool (my Dremel tool cut through the braid like nothing -- took about 60 seconds)
- insert the brass square head plug into one end of the braid and secure with a hose clamp (or you can just crimp down the end, but then the braid may float up in your mash)
Bulkhead- apply a few wraps of teflon tape to threads on the brass nipple
- securely attach female barb adapter to brass nipple
Step 3 - Outside Parts:

- pull brass nipple all the way through the hole in the cooler, and insert O-ring
- add fender washers as spacers to ensure a tight fit of the components once the ball valve is attached (mine needed 3 washers)
- apply teflon tape to the male barb connector, and attach it to the bal valve

Step 4 - Attach Stainless Steel Braid
- slide the braid onto the barb connector inside the cooler, and tighten the hose clamp
- slide the braid onto the barb connector inside the cooler, and tighten the hose clamp

The Finished Product
That's it. You now have a cheap MLT that was easy to put together. To be sure mine didn't leak, I filled it to the 10 gallon capacity with water, and let it sit for 45 minutes. Didn't leak a drop!


Comments
Be the first, drop a comment!